> ## Documentation Index
> Fetch the complete documentation index at: https://docs.meetdarwin.ai/llms.txt
> Use this file to discover all available pages before exploring further.
# Build an outcome
> Agent Studio → Outcomes: start from a template, name the form and say when the agent offers it, write the questions, add fit rules, choose what happens after the form and where the answers go, then save it live.
Build a form your agent opens in the chat, such as a quote request. It takes a few minutes, and the form works in the Agent Studio preview as soon as you've built it.
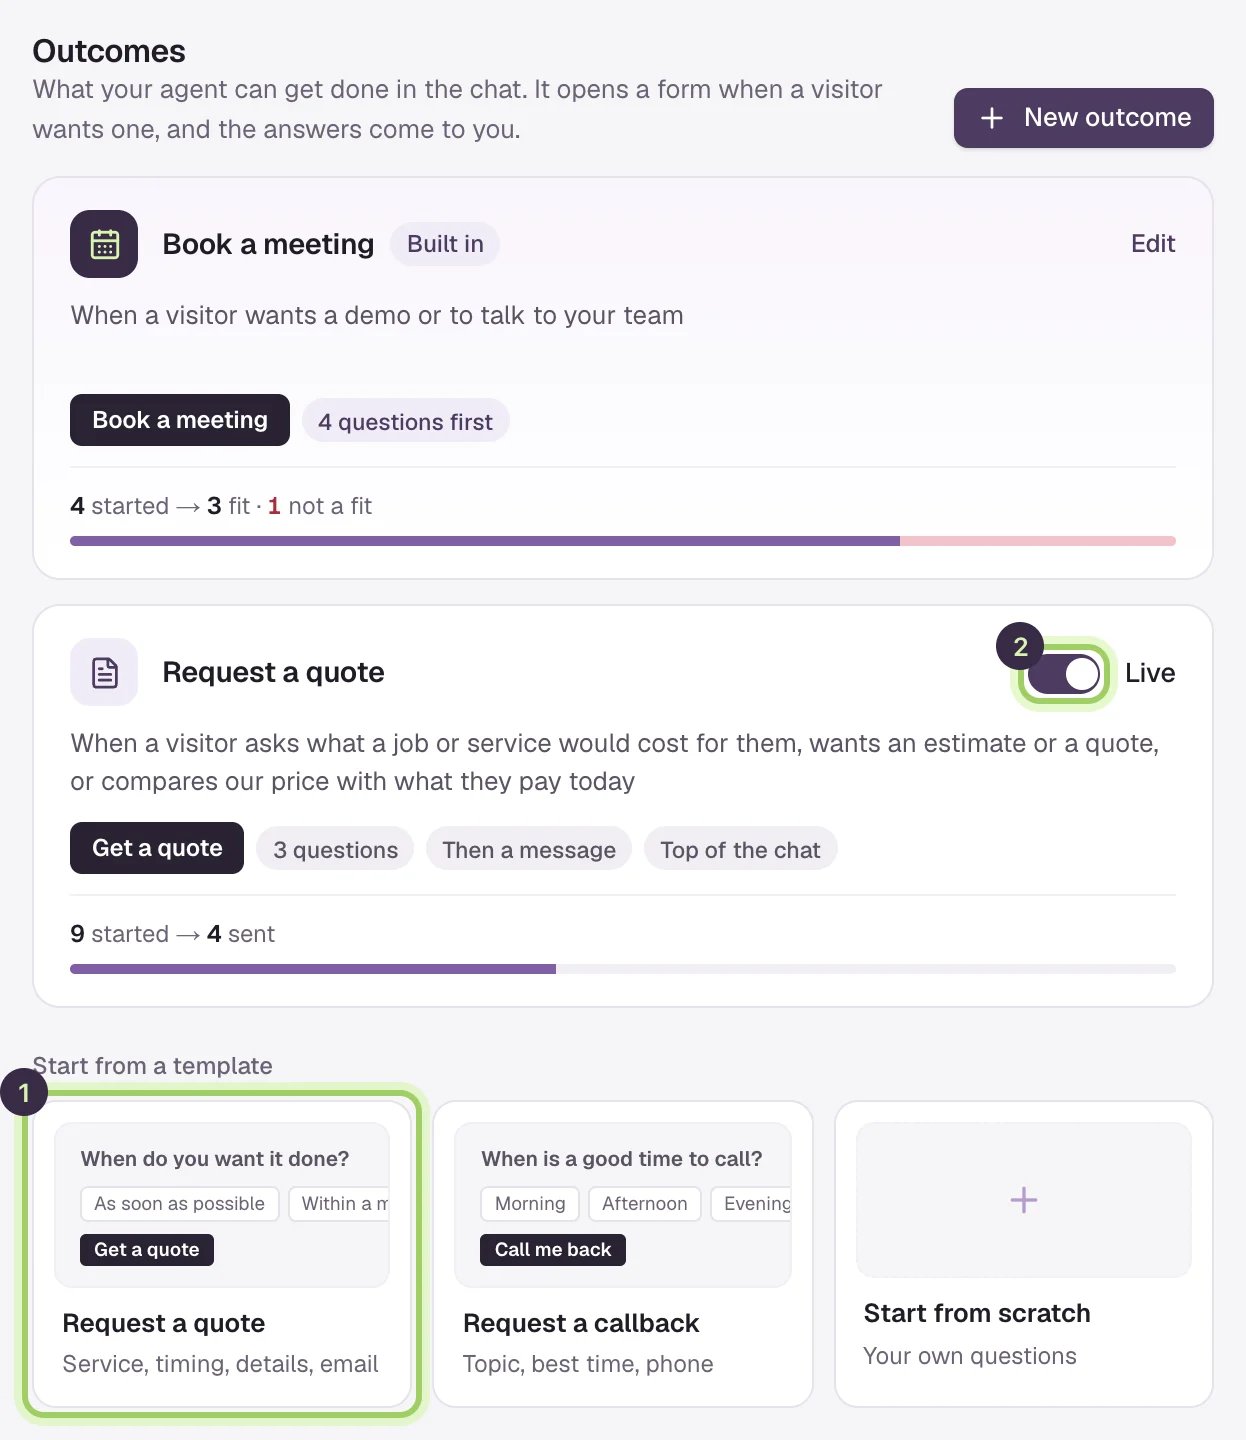
Open **Agent Studio → Outcomes**. **Book a meeting** comes first, then your forms, each with how many visitors started and sent it in the last 30 days.
Under **Start from a template**, pick the closest one (1), or select **New outcome** for a blank form:
* **Request a quote**: what they need, when, any details, then their email.
* **Request a callback**: the topic, a good time to call, and a phone number.
* **Start from scratch**: your own questions.
A form's switch (2) takes it live or off.
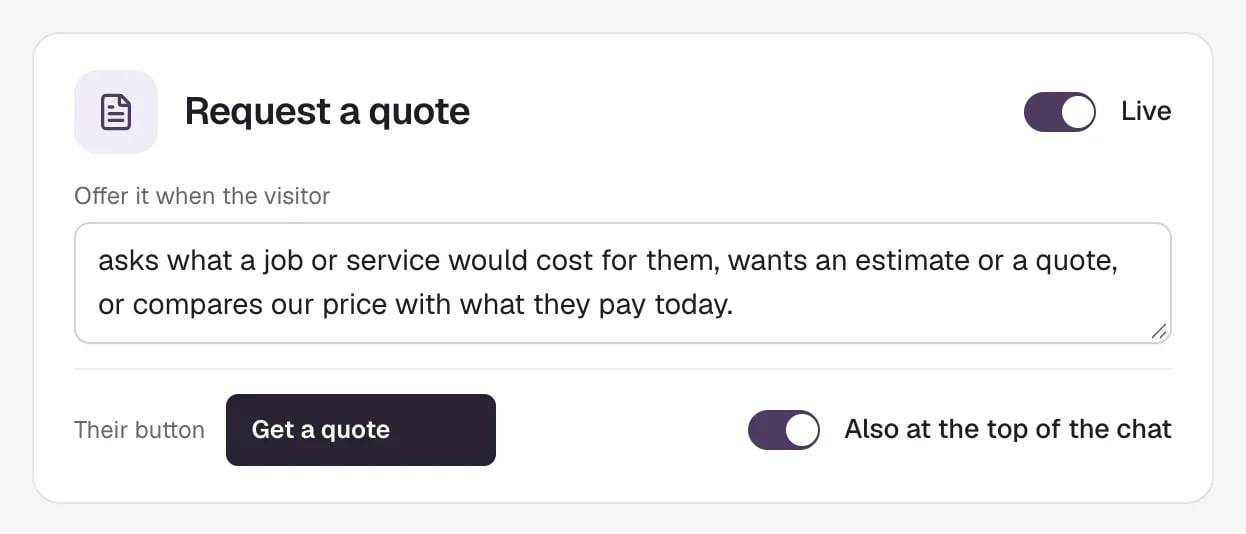
 At the top of the form, type its name. **Offer it when the visitor…** tells the agent when to open it, in your own words, such as "asks what a job would cost or wants an estimate".
**Their button** is the button visitors see above the message box when the agent offers the form. Turn on **Also at the top of the chat** to put the button under your agent's name, in place of Book a meeting. One form at a time can have that spot.
At the top of the form, type its name. **Offer it when the visitor…** tells the agent when to open it, in your own words, such as "asks what a job would cost or wants an estimate".
**Their button** is the button visitors see above the message box when the agent offers the form. Turn on **Also at the top of the chat** to put the button under your agent's name, in place of Book a meeting. One form at a time can have that spot.
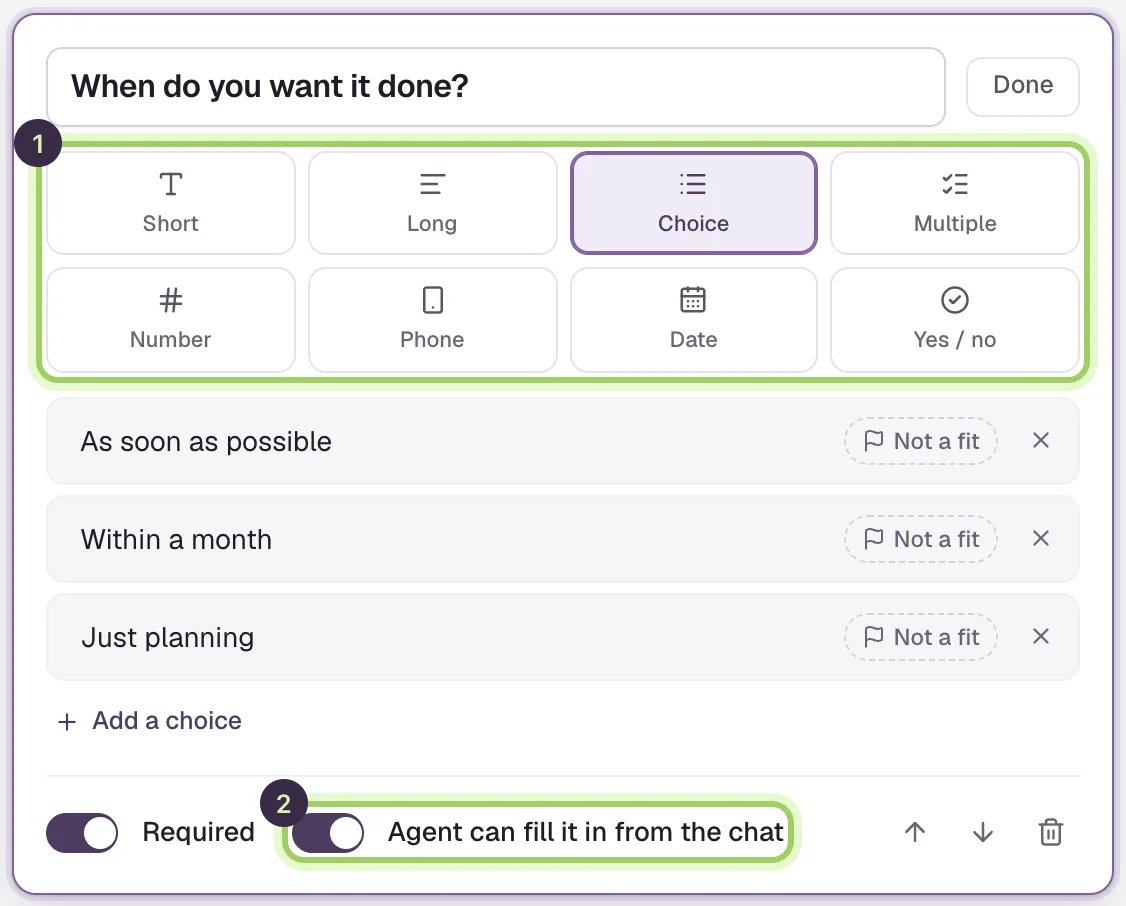
 Each question shows the way the visitor will see it. Select one to edit it: write the question, then pick its type (1):
| Type | The visitor |
| - | - |
| **Short** or **Long** | Types an answer |
| **Choice** | Picks one answer from your list (up to 12) |
| **Multiple** | Picks one or more answers |
| **Number** | Types a number, with a unit such as "pages" if you add one |
| **Phone**, **Date** | Types a phone number, or picks a date |
| **Yes / no** | Picks Yes or No |
Select **Done** to close a question. Add one from the **Add a question** row, use the arrows to reorder, and the bin to remove one. A form can have up to seven questions.
Two switches on each question:
* **Required**: the visitor has to answer it. Optional questions show **Skip**.
* **Agent can fill it in from the chat** (2): if the visitor already said it ("I need a quote for a kitchen refit"), the agent fills it in and the step shows as already answered. The visitor can go **Back** and change it.
Each question shows the way the visitor will see it. Select one to edit it: write the question, then pick its type (1):
| Type | The visitor |
| - | - |
| **Short** or **Long** | Types an answer |
| **Choice** | Picks one answer from your list (up to 12) |
| **Multiple** | Picks one or more answers |
| **Number** | Types a number, with a unit such as "pages" if you add one |
| **Phone**, **Date** | Types a phone number, or picks a date |
| **Yes / no** | Picks Yes or No |
Select **Done** to close a question. Add one from the **Add a question** row, use the arrows to reorder, and the bin to remove one. A form can have up to seven questions.
Two switches on each question:
* **Required**: the visitor has to answer it. Optional questions show **Skip**.
* **Agent can fill it in from the chat** (2): if the visitor already said it ("I need a quote for a kitchen refit"), the agent fills it in and the step shows as already answered. The visitor can go **Back** and change it.
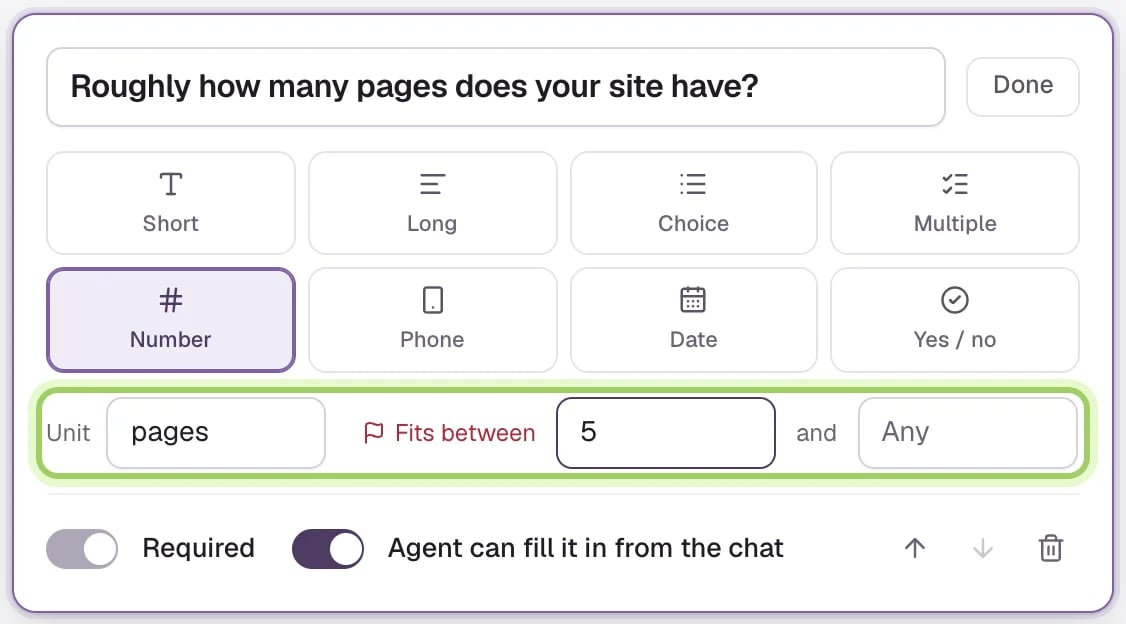
 Fit rules decide who goes on to book, and mark each request **Fit** or **Not a fit** for your team:
* On a **Choice**, **Multiple** or **Yes / no** question, select **Not a fit** beside the answers that rule a visitor out. Any one of them makes the visitor not a fit. At least one answer has to be a fit.
* On a **Number** question, fill in **Fits between** with the lowest and highest that fit. Leave a side on **Any** for no limit.
A question with a fit rule is always required, so it can't be skipped.
Fit rules decide who goes on to book, and mark each request **Fit** or **Not a fit** for your team:
* On a **Choice**, **Multiple** or **Yes / no** question, select **Not a fit** beside the answers that rule a visitor out. Any one of them makes the visitor not a fit. At least one answer has to be a fit.
* On a **Number** question, fill in **Fits between** with the lowest and highest that fit. Leave a side on **Any** for no limit.
A question with a fit rule is always required, so it can't be skipped.
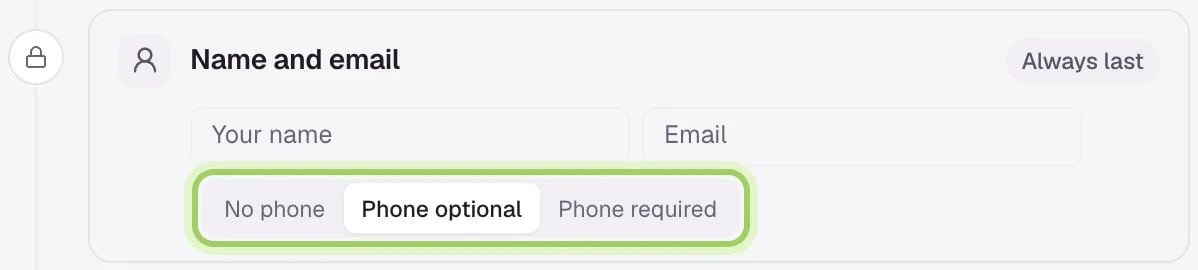
 **Name and email** is always the last step, so every request reaches you with a way to reply. Choose **No phone**, **Phone optional** or **Phone required**.
 Under **After the form**, pick one:
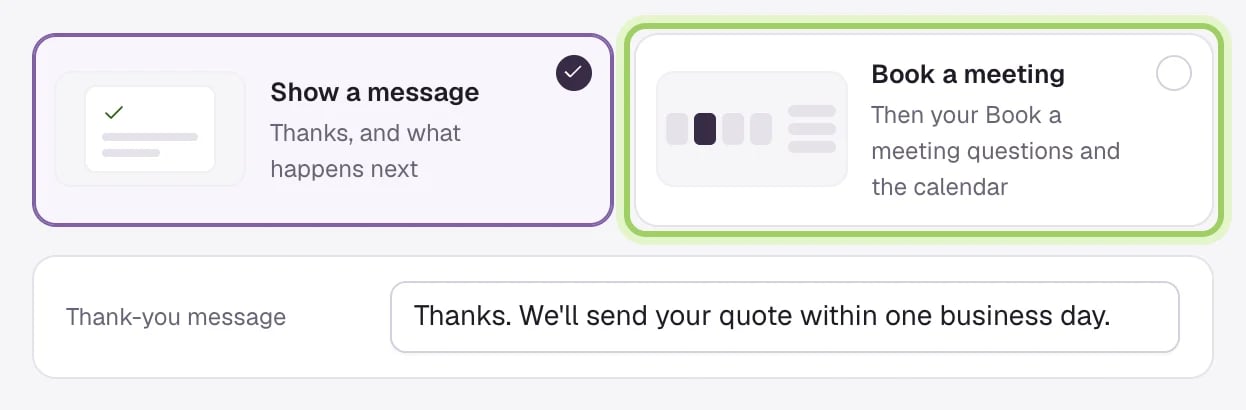
* **Show a message** thanks the visitor with your **Thank-you message**, such as "We'll send your quote within one business day."
* **Book a meeting** (marked) goes on to booking once the form is sent: your Book a meeting questions if you set some and the visitor hasn't answered them yet, then the calendar, under your **Above the calendar** message. Tick **Visitors can send the request without booking** if a booking is welcome but not needed.
When a question has a fit rule, **If they're not a fit** sets the message a visitor sees instead of the calendar. Their request still comes to you, marked **Not a fit**.
Under **After the form**, pick one:
* **Show a message** thanks the visitor with your **Thank-you message**, such as "We'll send your quote within one business day."
* **Book a meeting** (marked) goes on to booking once the form is sent: your Book a meeting questions if you set some and the visitor hasn't answered them yet, then the calendar, under your **Above the calendar** message. Tick **Visitors can send the request without booking** if a booking is welcome but not needed.
When a question has a fit rule, **If they're not a fit** sets the message a visitor sees instead of the calendar. Their request still comes to you, marked **Not a fit**.
 **Send answers to**, at the bottom of the form, shows where each request goes:
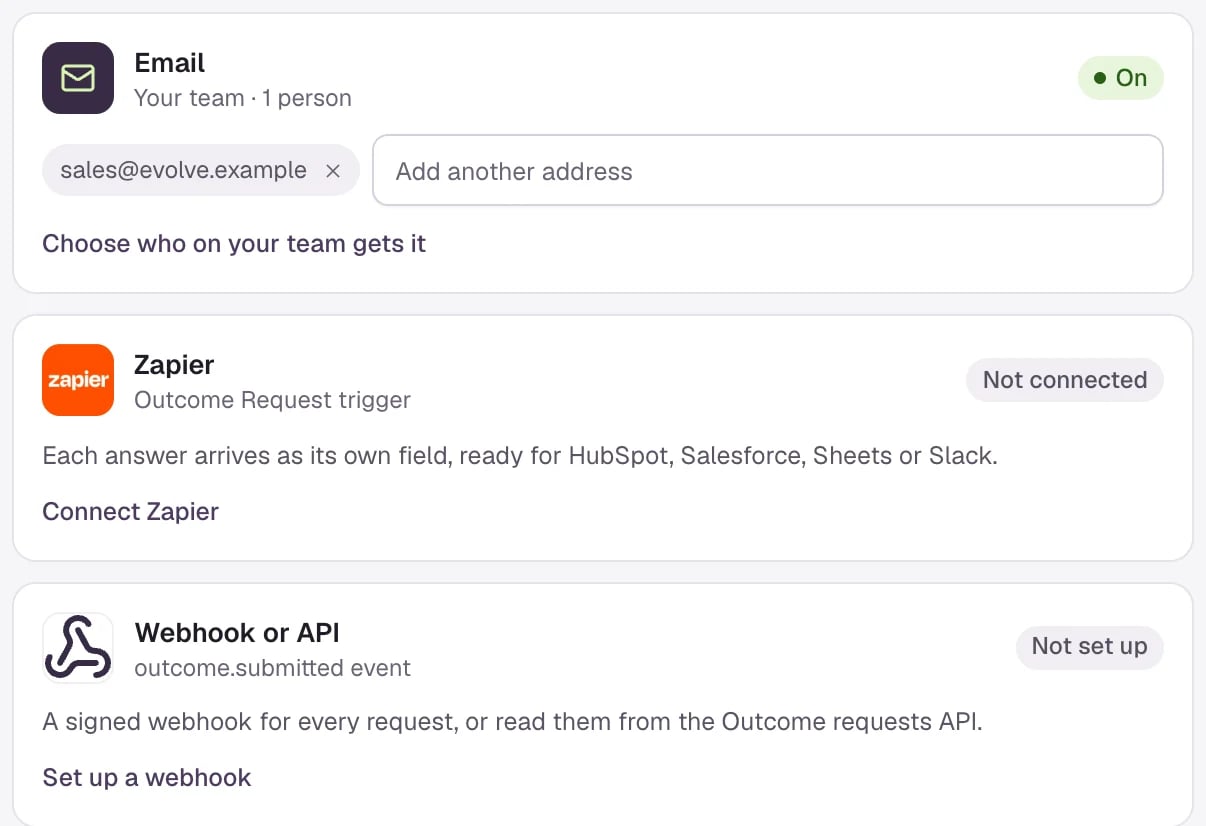
* **Email** goes to your team. Under it, type up to five more addresses, such as sales@ or a shared inbox, and press Enter after each. **Choose who on your team gets it** opens [Notifications](/account/notifications).
* **Zapier** and **Webhook or API** show whether they're connected, with a link to set them up.
**Send answers to**, at the bottom of the form, shows where each request goes:
* **Email** goes to your team. Under it, type up to five more addresses, such as sales@ or a shared inbox, and press Enter after each. **Choose who on your team gets it** opens [Notifications](/account/notifications).
* **Zapier** and **Webhook or API** show whether they're connected, with a link to set them up.
 See [Requests and follow-up](/outcomes/requests) for what each one sends.
Turn on the switch at the top to make the form **Live**, then select **Save changes** in the bar at the bottom, the same bar as the rest of Agent Studio. **Discard** puts back what was saved. A form that's off is saved but never shown to visitors.
See [Requests and follow-up](/outcomes/requests) for what each one sends.
Turn on the switch at the top to make the form **Live**, then select **Save changes** in the bar at the bottom, the same bar as the rest of Agent Studio. **Discard** puts back what was saved. A form that's off is saved but never shown to visitors.
 To check it, ask for a quote in the Agent Studio preview, or whatever the form is for. The agent opens it there, and a request sent from the preview is never billed.
## Change or remove a form
Select a form's name in the list to change it, then **Save changes**. Visitors who open the form after that get the new version.
**Remove**, at the top of the form, takes it away for good. Requests already sent stay in **Meetings → Requests** and in Conversations. To pause a form instead, turn its switch off.
## Good to know
* The **Offer it when the visitor…** sentence is what the agent reads to decide when to open the form. Name the words visitors use, such as "price", "estimate" or "how much".
* Keep forms short. Every question is one more step before the visitor reaches **Send request**.
* Book a meeting has its own questions, set on its card. See [Ask questions before any meeting](/outcomes/in-the-chat#ask-questions-before-any-meeting).
Put the form at the top of the chat or on a button on your website.
Find sent requests and send them to your CRM.
This documentation is built and hosted on [Mintlify](https://mintlify.com), a developer documentation platform.
To check it, ask for a quote in the Agent Studio preview, or whatever the form is for. The agent opens it there, and a request sent from the preview is never billed.
## Change or remove a form
Select a form's name in the list to change it, then **Save changes**. Visitors who open the form after that get the new version.
**Remove**, at the top of the form, takes it away for good. Requests already sent stay in **Meetings → Requests** and in Conversations. To pause a form instead, turn its switch off.
## Good to know
* The **Offer it when the visitor…** sentence is what the agent reads to decide when to open the form. Name the words visitors use, such as "price", "estimate" or "how much".
* Keep forms short. Every question is one more step before the visitor reaches **Send request**.
* Book a meeting has its own questions, set on its card. See [Ask questions before any meeting](/outcomes/in-the-chat#ask-questions-before-any-meeting).
Put the form at the top of the chat or on a button on your website.
Find sent requests and send them to your CRM.
This documentation is built and hosted on [Mintlify](https://mintlify.com), a developer documentation platform.